Welcome back to my thesis blog! Each blog post will cover a different element the creation of "Fairy Play." This week's blog post will cover the modeling design of our characters for different lighting techniques, as well as the tests and technical artistry that went into texturing them.
Modeling The Toy Soldier
Lighting design played a key role in every aspect of "Fairy Play," beginning with character design and modeling. Our character designer Luis Ponce Piñon designed the original turnaround for the toy soldier and our Story Lead Riley S. Quinn designed the porcelain figurines. Our lead character modeler Jonah Hausmann then modeled the designs, and I ran lighting tests to ensure that certain lighting techniques would create the desired effect for each character. When we could not receive the desired lighting effect, I requested modeling revisions or implemented other solutions, such as blend shapes.
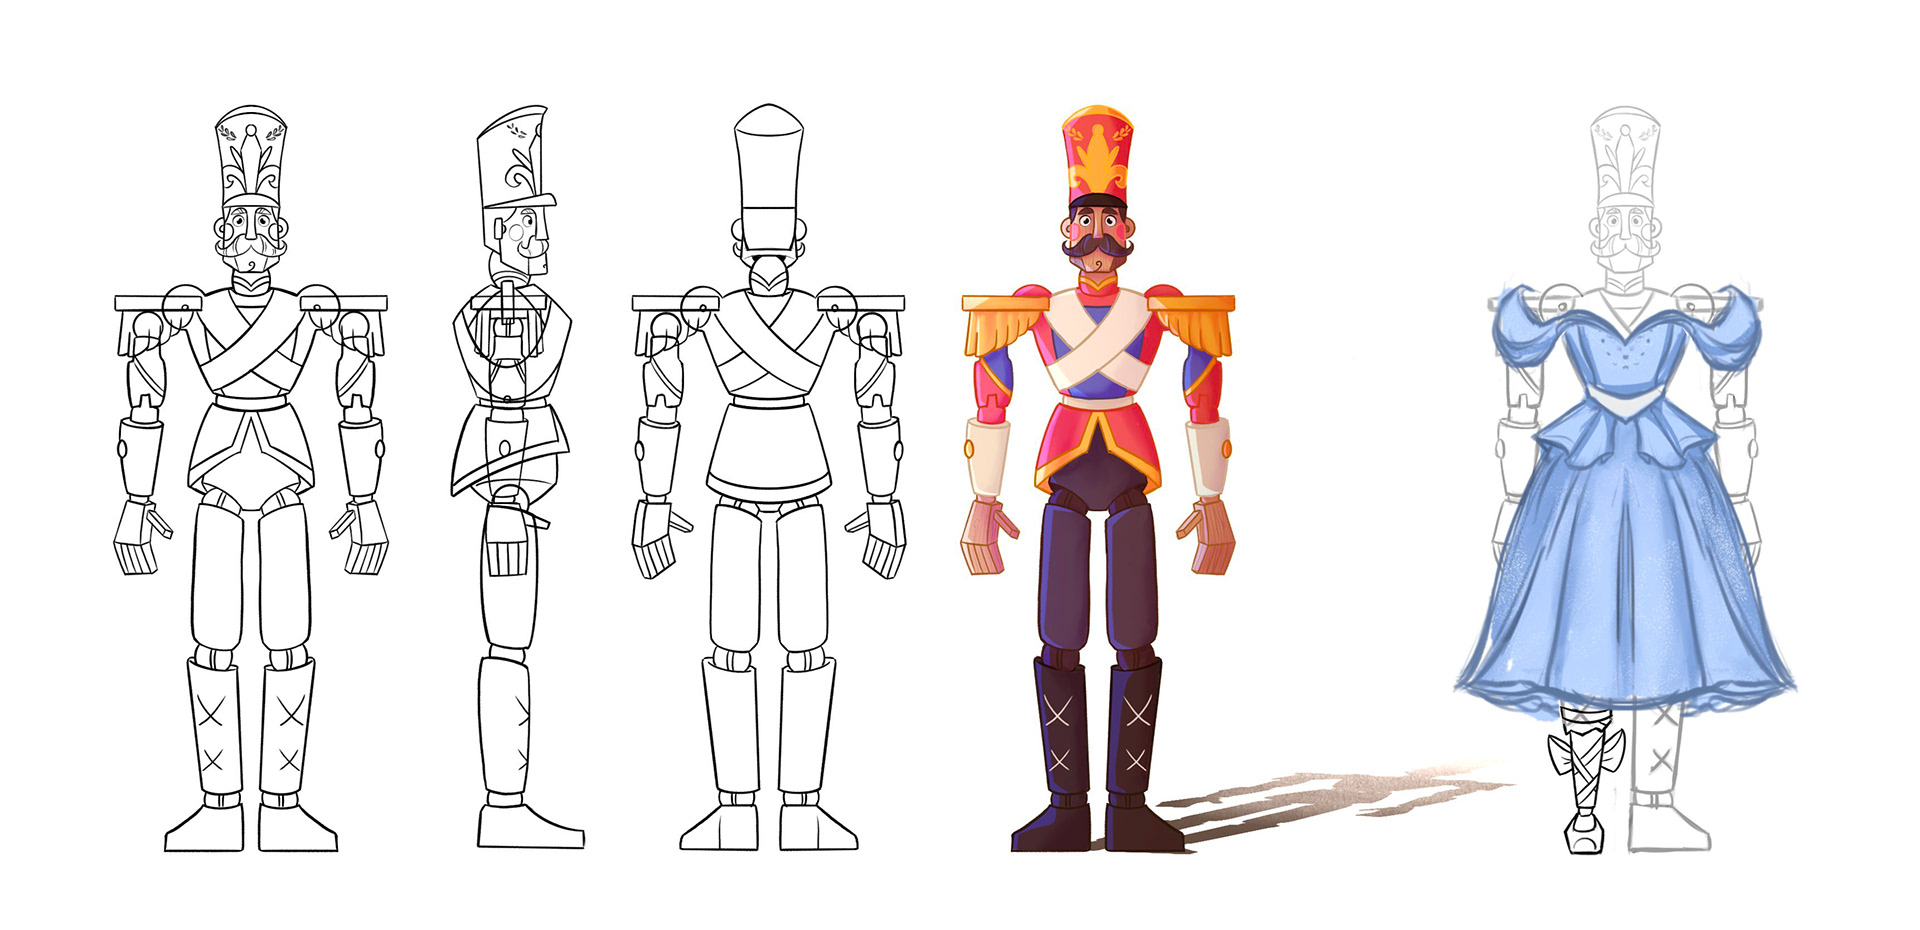
Original Toy Soldier turnaround by Luis Ponce Piñon


Initial character model turnaround by Jonah Hausmann. The hands were revised later to include articulated fingers.
The story’s protagonist needed sharp edges and angles that would allow them to be lit flatteringly or unflatteringly. Their cap was designed to cast shadows over their eyes from any high lights, utilizing “Godfather” lighting to give them a menacing look. In contrast, the toy soldier needed to look kind when lit by butterfly lighting. When lit from a light closer to eye level, the toy soldier’s sharper edges would soften, and the contours of their jawline would provide a dynamic shape akin to the cheekbones of a Hollywood celebrity. The winged tips of the toy soldier’s mustache also imply a butterfly shape that is unique to the character, yet intrinsic to the lighting style. When the toy soldier is under-lit, their mustache creates an uncanny shadow across their cheeks.

"Godfather" lighting test

"Butterfly" beauty lighting test

"Morticia Addams" lighting test

Under-lighting test
Rembrandt lighting posed a unique challenge for the character’s design. This lighting style is characterized by a triangle of light on one cheek, which requires a cheek bone or bump and an angular nose to cast shadows across the face in a specific shape. The toy soldier originally had a flat nose and no cheek bumps, which made this lighting technique impossible. To accommodate the lighting technique, the character modeler subtly pushed out the bottom of the toy soldier’s nose at an angle to allow for a more angular shadow. The rigging lead also created a blend shape that created subtle cheek bumps in the film’s final scene. This made Rembrandt lighting possible only during the story’s conclusion, when the toy soldier had found peace.

Rembrandt lighting with no cheek blend shapes

Rembrandt lighting with cheek blend shapes
Modeling the Porcelain Prince and Princess
The story’s antagonists — the porcelain figurines — contrasted the shape language and design of the toy soldier. Their faces and bodies were round and soft, which gave lights from most angles a soft fall-off. This made harsh lighting more forgiving for the porcelain figurines; a high light that would make the toy soldier look menacing might still look like glamor lighting for the prince and princess. This also made dynamic lighting angles and sharp shadows intentionally difficult to cast upon them. Unlike traditional 3D character models, the porcelain prince and princess do not have an A-pose. Their neutral pose is locked in a waltz. Each figurine rests on a pedestal with a latch that clicks together, and the negative space between their bodies evokes the shape of a heart. They are literally built for each other.

Porcelain model initial render by Jonah Hausmann

Rendered porcelain turnaround by Jonah Hausmann
Texturing Painted Wood and Porcelain
The characters of “Fairy Play” are each crafted from specific materials that support the narrative. The prince and princess are porcelain: shiny, smooth, and brittle. The toy soldier begins as an entirely wooden object. These also needed to contrast with the plastic dollhouse that serves as the film’s primary stage. To accomplish the desired materiality, I ran “wedge” tests to refine each material, using real objects as reference material and progressively altering attributes such as specular roughness and IOR until the CG characters felt close enough to their real-world counterparts. These settings were then incorporated into texture maps in Adobe Substance 3D Painter to add imperfections such as scratches and subtle paint strokes. Certain materials used unique components of the Maya Arnold Standard Surface shader that were absent elsewhere in the film, which helped them stand out. The porcelain figurines used the “coat” setting; this gave them a second layer of gloss found in glazed surfaces such as porcelain. The toy soldier is initially covered in a coat of paint; I adjusted the IOR to match the gloss of a nutcracker that I owned, and increased the specular intensity for the yellow detailing to match the metallic paint found on the gilding of most nutcrackers.
Toy soldier IOR wedge test
Toy Soldier Look Development Turntable
Porcelain Prince and Princess Turntable
Coming up next: The dresses, ballet leg, and makeover designs of "Fairy Play"